Saturday, 25 February 2017

Tattered Lace 4th Anniversary - What a week it's been.

Can you believe that Tattered Lace are celebrating their 4th Anniversary? I am astounded by the progress they have made in the craft Industry in that time. Stephanie Weightman designs stunning products and I have the amazing honor of being part of her design team and get to make show samples.

The cards below were made using the newly released Botanical Rose Tapestry die and the anniversary sentiments.


I hope you can see just how versatile the Botanical Rose Tapestry die is. There are so many ways you can snip into it and create different looks.


These next cards were made with the Spring Petals die set and the Anniversary words.


I had just 2 days from these dies dropping through my door to the finished cards being in the post, quick turn around huh! It was an easy task as the dies are so inspiring. 

Next week I will be doing a blog post to show you my thought process when I receive a die to make samples with and how I put the die through what I call the "snipability test"

I hope you'll stop back and see what else I have to offer soon.

Have a super weekend.

Monday, 20 February 2017

How to colour a stamped succulent image - Altenew tutorial

Hello everyone, I've just returned from a short break and am feeling relaxed and refreshed so thought I'd share a tutorial with you all.


In this tutorial I am going to walk you through colouring a stamped succulent image using blendable pencils and Altenew stamps.


I started by stamping my image using Memento Ink - London Fog onto NeeNah cardstock


I will be using 3 shades of green in the leaves, I start adding the darkest shade to the base of the leaves.


I then add a mid tone of green over what I have coloured and a little further up the leaves


Next I add my lightest colour over the already coloured areas and again a little further up the leaves but making sure to leave some white area near the tips.


At the very tips I add some hot pink pencil


Here I use some blending solution and a paper stump to blend the colour to give a smoother look.


Now for the pot I use the same method but this time with shades of brown, Darkest first


Then a medium brown


Then light brown


I also added some grey around the base of the planter so it becomes grounded and doesn't look like it's floating.


Once again I blend the colours as above.


I then stamped a sentiment onto a piece of white card, added some black twine and a piece of pink vellum and attached them to my card.


I then embellished using some Nuvo Jewel drops in a green colour to fill some of the white space.


I hope you've enjoyed todays post, I hope to bring you more crafty tips and tutorials soon.


Friday, 17 February 2017

Dino Day

Today I am sharing some Dinosaur themed cards.

My daughter and her friend are a little Dino crazy and after a week of mock exams I treated her to a set of Dino Friend stamps from Hunkydorys For the love of stamps.

After a couple of hours stamping, colouring and cutting here's what I made.


I love a clean and simple card and this is just that. 2 dinos stamped, coloured, cut and mounted on a card.


This one is a little bit of fun, I can't tell if her looks like he's running after someone or way from something.


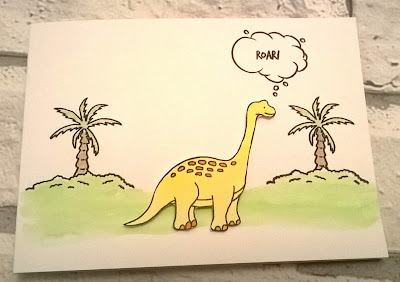
Now I saved my favourite till last, I stamped and water coloured the background and then stamped,water coloured and fussy cut the dinosaur. It's so simple and clean and it's going nowhere, I'm keeping it as I love it so much.


Wednesday, 15 February 2017

The packaging matters too.......Robins nest DT project


Do you want to know how I made this gift card holder? For a full step by step tutorial pop over to the Chattering Robins blog here>>>> http://chatteringrobins.blogspot.co.uk/


Monday, 13 February 2017

Spring flowers

Who else is excited about spring being just around the corner? The though of all those little bulbs pushing through the surface of the soil and petals opening to display an array of colours and shapes.

Whilst waiting for the flowers to bloom I decided to created some of my own.


The tulips in this card are coloured with pencil, something which is new to me.


The dahlia was stamped using a layering stamp and tonal inks, I love how crisp and clean it looks.

I think I may need a trip to the garden centre to plan my flower beds.


Saturday, 11 February 2017

Tattered Lace DT projects - Envelope closure dies

Good Morning everyone, Today I am sharing some of my projects which I made for Tattered Lace dies, the cards and dies are on air on Create and Craft TV this weekend.

The dies's are designed to be an envelope closure but I like to change things up a little and see what else we can do with them, so here goes.


The star makes a great design feature, here I've used it to create a circle around a sentiment on my card.


With Easter not to far away I was feeling a little springy, I used the flower closure to create pop up petals o my card.


I wanted to create an Elegant card so used the heart closure to thread ribbon through.


A cute door hanger using the butterfly closure.


Here the hearts are creating some dimension on this wedding card.


Dies dont have to be used just in the way they are designed. Stephanie Weightman of Tattered Lace designs her dies so they have at least 3 way in which they can be used, I like to see if I can push this even further.

I hope you've liked to days cards.

Have a great weekend.

Thursday, 9 February 2017

Throwback Thursday.......

It's Thursday and that can only mean 1 thing.........1 more day until the weekend.

Today I am taking a walk down memory lane and looking at some of the cards I made last year, time really does fly and sometimes we forget the things we've accomplished so today I will look  back and admire,I hope you'll join me


This card has to be one that I remember the most as I fell in love with the colours and tranquil vibe it projected. 


I adore this card as it's so feminine and dreamy, It was my first easel card and I managed to get it in a magazine.


My first shaped card I believe, cute, chintzy and all round pretty.


This card was made as Clare Curd did a Craft-along on the Craftwork Crads Blog and I joined in.


I loved the colour of the papers in this kit as well as the shaped cards, I couldn't resist a bobin card.


Now this idea just happened, each time I look at it I think if I had only of turned it sideways it looks like a collar and blouse.


Oh yummy biscuits, I couln't wait to get my hands on this kit, the colours are so fresh and scrumptious.


I made this card with the left over pieces from one of my paper kits, they were only small pieces but far to pretty to throw away.


Now I feel energised and have lots of ideas going round in my head, I hope I've given you some ideas with these cards. Feel free to ask questions or leave comments below, take care.

Wednesday, 8 February 2017

We all need a little Serenity in our lives.

There are time in our lives where we all need a little serenity and yesterday was one of them.

I needed a little me time and wanted to chill out so grabbed my Serenity kit from Craftwork Cards and set about making a couple of cards.


This first card is so clean and calm. I love the colours and feel.


I used some off cuts which I made a back ground with, I then cut a panel of white card and die cut a feather from it, I placed this over the background I made and added another die cut feather from one of the papers in the kit. I added some twine and a die cut sentiment then layered this on to some pattered paper and then onto a card blank.

The second card I made is very similar 


I chose to use different paper and added some washi tape this time but kept the overall theme the same.


I only have a little left from this kit but I know I will be using it up really soon.

Thanks for stopping by today, see you soon.


Tuesday, 7 February 2017

Wax crayons and blowing bubbles, I'm a big kid at heart.

Good morning crafty friends, today I am sharing something a little different with you.....

I recently won a gift voucher to spend at Visible Image Stamps, yay I love their stamps. I decided that I would get myself the Sparkle in the rain stamp set and one of their sentiment sets. Today I wanted to show you how I created 2 projects using one stamp set.


For my first project I used a canvas board and a wax melting technique.  I started by stamping the Lady in Versamark Ink and heat embossing her. I then cut and folded a temporary canopy to go over the umbrella as I didn't want the wax to go over the stamping.


I then used cheap, really cheap wax crayons and melted each colour a little letting it run down the Canvas board. I love the effect it creates.


For my second project I have made a card, I created the background by blowing bubbles, yes you heard me right blowing bubbles......   I mixed some acrylic paint, washing up liquid and water and blew into it with a straw. As the bubbles reached the top of my container I placed some card on top, I repeated this twice more as I wanted 3 colours in the background.


Once dry I stamped my main image in black and then added the rain details in Versamark Ink and heat embossed with clear sparkle embossing powder.


I love thinking of different ways to use my craft products along with other things I already own at home. I home I've sparked your imagination.