Monday 25 March 2019

3 Ways With Altenew's Spring Shower Cover Die

Happy Monday Crafters, I hope you all had a good weekend.

Today's edition of "3 Ways With" is all about the Spring Shower Cover die from Altenew.  I was totally inspired to use this die by the sunny weather and all the seeds and bulbs I have been planting recently. Is it just me or does the sight of a shoot popping through the soil surface spark the ultimate joy?


The Spring shower cover die is an amazing die and I had real trouble deciding which 3 ways to share with you as there really is so much that you can do with this die, even my 14 year old son said "you could easily do 10 things with it"......


Stencilling/Embossing


The die cut panel can be used as a stencil for either spraying through, doodling through or to add ink.  I decided to use it to add embossing ink over an ink blended background. I then heat embossed the pattern in crisp white embossing ink.

I added a sentiment using script word dies and the ampersand from the Merry Christmas die set. I cut this in both white and pink. I added the sentiment on to a piece of vellum before placing it onto a card.

Die cut Florals


I cut the Spring Flower cove die from 6 different coloured piece of card, I chose spring colours that would look good for the floral theme.

The packaging shows a layering guide on how to put the die cut piece together but I went rogue and made my own designs. I added the flowers to a background panel from the Dotted scale cover die. The sentiment is from the Hope stamp and die set.

Paper Piecing 


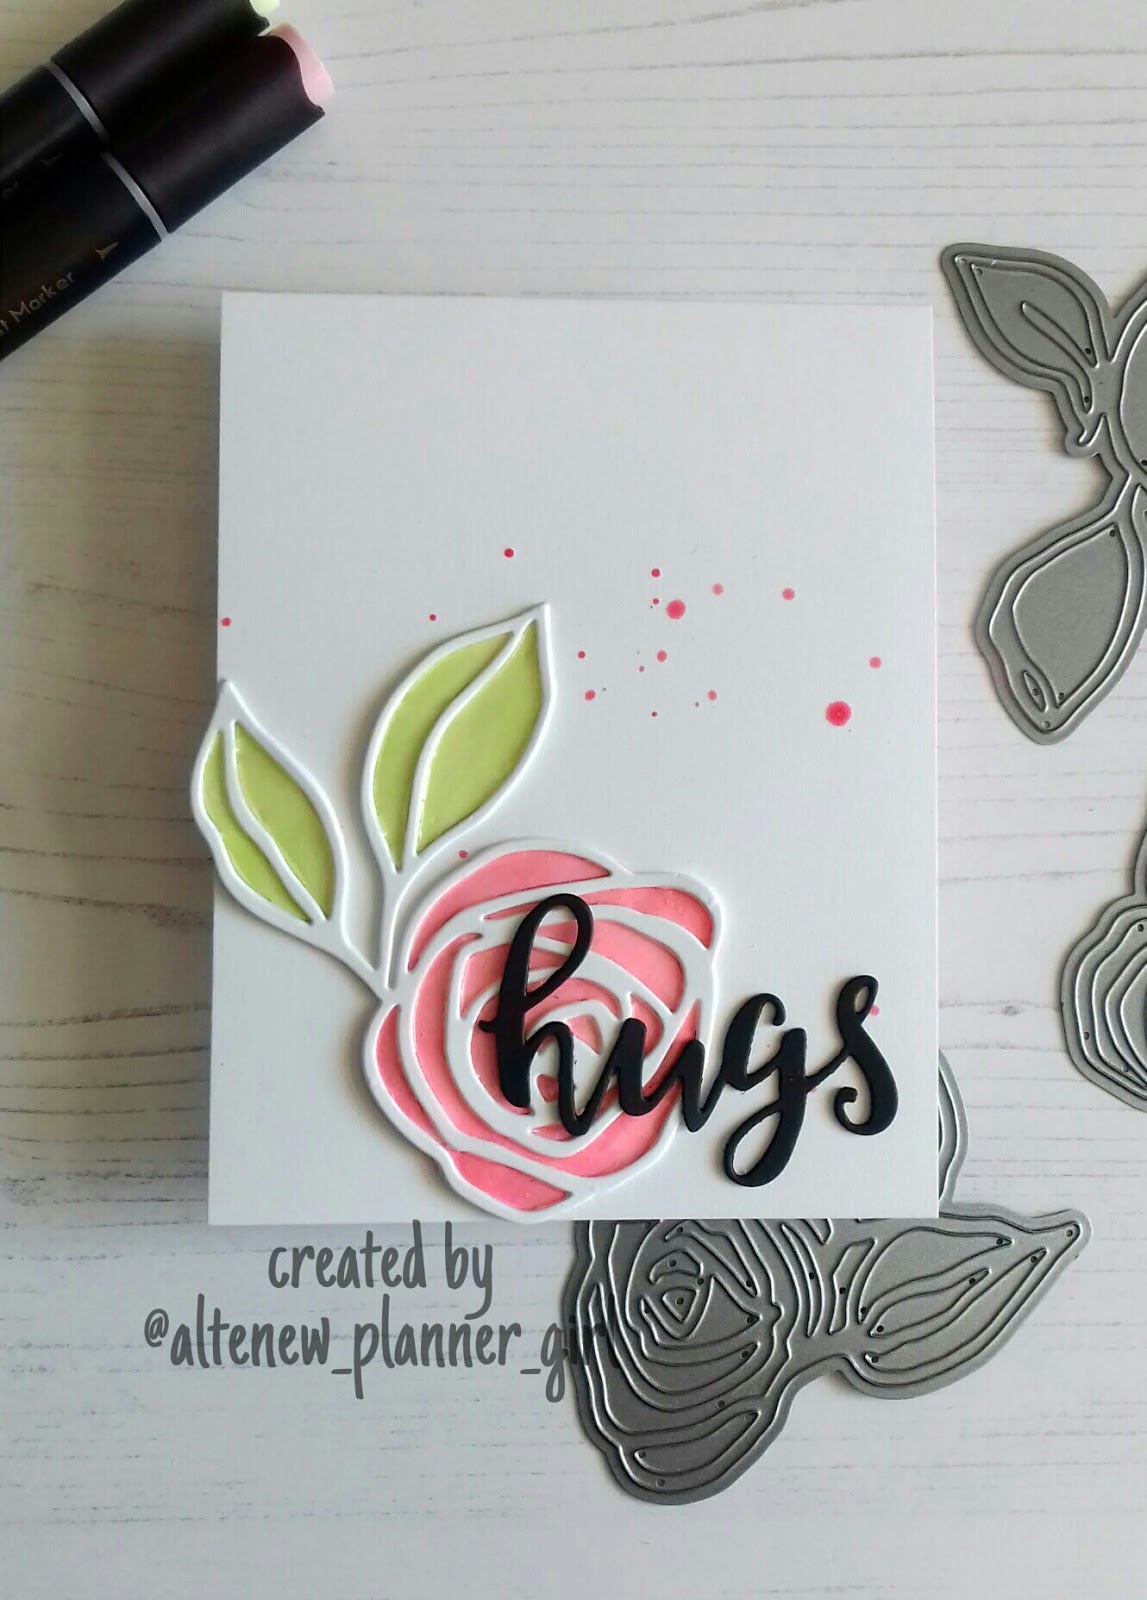
I had lots of the flowers and leaves from having cut the die 6 times so decided to do a little inlaid/paper piecing project. Trying to find which little piece goes where can be tricky so keep the die and or the packaging close to hand to refer to.

I added a sentiment using the Hang in there die, which I cut from white and one of the colours from the flowers to create a drop shadow effect.


I hope I've given you some inspiration on how to use the Spring shower cover die, If you do create a project based on what I've shared please tag me on social media as I'd love to see your creations.

Products Used
Merry Christmas Die Set


***My links to Altenew products are affiliate links, this means that I get a small commission from Altenew for each purchase made, this does not cost you any more, however it helps me be able to create more content and share inspiration.  I truly appreciate any purchase made using my links.***

Sunday 24 March 2019

STAMPlorations Stencil Sunday

Welcome to Stencil Sunday part 2 with me, Terri Koszler

I've mad 2 projects using lot's of stencils, stamps and dies from STAMPlorations.


To see more details about how I made my projects and which products I used pop by the blog using the link below


Monday 18 March 2019

3 Ways with -Altenew's Watercolor Brush Markers

Hey Crafty friends, today's "3 Ways with" is all about using Altenew's Watercolor Brush Markers to create different background effects.
I love to put products to the test and find new ways to stretch their use in my crafty arsenal. I am going to show 3 fun ways to create backgrounds using household items, I have even recorded myself in action (my video's are by no means professional), I wanted you to be able to see how easy each technique was, so here goes;


Marbling with Shaving foam


Have you ever tired to Marble with a watercolor brush marker? It's fun and easy to do.  My tip here is to use the cheapest shaving foam you can find and have everything set out ready to use.  If you marble onto a smooth/glossy paper then you achieve a brighter image as the paper doesn't suck in the colour and mute it. 


I kept this card simple, Rose Gold embossing powder and Vellum, nothing else was needed.

Bubble Background


Do you remember being a kid and blowing bubbles in juice or milkshake with a straw? Well it turns out the adult version of this is to create bubbly backgrounds with washing up liquid, water and watercolour brush markers.


I added a floral heart frame die cut with I covered with Rose Gold embossing powder and added a heat embossing sentiment.  This is a really fun craft activity you could try with the kids at the weekend.

Salty Cells


Now, you may have seen a few of my cards recently where I have created watercolor backgrounds, my trick is to tape your watercolor card to a wooden board as this prevents warping. The next tip is to use chunky sea salt onto the wet surface, this sucks up the water and creates cells and patterns.

Dont throw the salt away, it can be used in shaker cards!!!


After the background was dry, I placed a piece of scratch paper over the top and used a craft iron to remove the clear embossing powder, brilliant when you want a resist but dont want the shine.  I then heat embossed the detail layers of the wild fern in rose gold, into the negative space.

Phew, that felt like a mammoth post, but I wanted to give you some fun and creative ways to get more from your watercolor markers.


Here's the links to products used in today's post;


***My links to Altenew products are affiliate links, this means that I get a small commission from Altenew for each purchase made, this does not cost you any more, however it helps me be able to create more content and share inspiration.  I truly appreciate any purchase made using my links.***


Thank you for stopping by, I hope you'll try these techniques out and share your results via social media.

Monday 11 March 2019

3 Ways with Altenew's Glitter flurries washi tape

Good Morning, welcome to another episode of "3 ways with", today I am focusing on washi tape and in particular, the glitter flurries washi tape from Altenew.

When Altenew first launched washi tape I wasn't sure if it was for me, I thought to myself "I like to stamp in my cards, why would I need washi tape?"

Well, after seeing all of the inspirational DT projects I changed my mind and jumped online to order some.  The glitter flurries washi is so very beautiful. Purples and golden accents, it's like a yummy dream.

so today I am going to share 3 of the easiest ways to use this washi tape.


Covering a background.


One of the easiest ways you can use washi tape is to cover a background on your project.  Here I have covered a panel measuring 4" by 5.25" in the washi, I then mounted it onto a card base, leaving a clean white edge, this helps to balance the design.  


I added a piece of vellum that measures 3" by 4.25" to the centre of the card and added my gold sentiment using the script word dies and the ampersand from the Merry Christmas die set.


Fussy cutting.


The beauty of a floral washi tape is it's snip-ability (is that even a word?) I added a piece of the washi to a white card panel, I then sit with a cup of tea and my feet up and fussy cut around the flowers. I find it best to cut more than I think I'll need and put them into a little cello bag for another project. 


I like to add fussy cut flowers to a white background, but sometimes this can look a little stark so I like to add subtle detail. This time I used the Dotted scale cover die to give a little bit of detail in the background. I added a gold sentiment using a die from the Envelope liner die set.

Die cutting letters.


Sometimes you want a card that's simple yet packs a punch, that when die cut letter fro washi tape come in.  Simple add some washi to a piece of card and cut using your chosen dies. I used the Bold Alpha dies, I love the bold, simple style as it doesn't take anything away from the washi pattern or overpower the card design.


To add a little background detail I used the Magnolia heart stamp and Silver lake crisp ink.  I also used a piece of the golden edge washi tape and some gold thread to add a feeling of luxury.

As always, I have linked all of the products used in today's post below.

Products used


***My links to Altenew products are affiliate links, this means that I get a small commission from Altenew for each purchase made, this does not cost you any more, however it helps me be able to create more content and share inspiration.  I truly appreciate any purchase made using my links.***


Sunday 10 March 2019

STAMPlorations Stencil Sunday


Thanks for stopping by today, I am really excited to share the news that I am featuring over at ARTplorations. Today see's a revive of the Stencil Sunday feature. 

I have created 2 projects which can be found on the STAMPlorations blog using the link below.


Thursday 7 March 2019

STAMPlorations CAS card challenge March


It's time for the March CAS Card challenge over at STAMPlorations, this month the added colour twist is Coral Pink.


I created a card using the Smile stamp and some water based inks. I love the clean simple style of this stamp set, very classic and pretty.


To join in with the challenge, visit the link below, where you will find all the details on how to link up and prizes.

https://stamplorations.blogspot.com/2019/03/cas-challenge-march.html

I have a discount code for you to use on the STAMPlorations store which will entitle you to 20% off your order, this can not be used with other discount codes

Use>>>>>>  STAMPGIRLTERRI when checking out at http://stamplorations.com/shop/

Monday 4 March 2019

3 ways with - Altenew's Rose Filament dies


Welcome to the 8th episode of 3 Ways With. Today I am focusing on the Rose Filament dies set from Altenew.


The Rose filament dies are one of the products that I associate most with Altenew, not only do they have the dies but they also have a stamp set and enamel pin badge which bare the same design.

So let's get on to my cards, first up I used the dies for some partial die cutting, creating a fancy shaped edge.  


In order to strengthen the border, I die cut the flowers, coloured them, clear embossed them and placed them over the partial die cut edge.  I wanted to keep the elements on this card to a minimum so opted for a simple heat embossed sentiment and some splattered ink.


This card all centres around one of the die cuts, which I have used to create a faux chipboard sticker effect, complete with enamel look.  To do this I die cut 4 of the roses, for one of them I kept the pieces in and added some tape to the reverse to secure it. I then used Artist Markers in Frayed and Cotton Candy to colour the rose.

Next I added 3 more roses on top to create depth. I then added glossy accents in all of the open areas to create the enamel look.  A few ink splatters and a die cut sentiment later and the card was complete.


Last up is this very modern looking card.  I cut several of the roses and coloured them using the Artist markers. I then clear heat embossed them to give a high shine finish.  Using glossy accents I adhered them to a card blank, making sure to go over the edges, I then trimmed them back. I added a Mega Hello sentiment on foam pads to give height and contrast.

Well thats all from me for today, below are the links to the products used, I hope you'll try using your dies in a new way. Have a great week.