Showing posts with label paperbabe stamps. Show all posts

Friday, 10 May 2019

Paperbabe Stamps Challenge #93

It's time for a new challenge at Paperbabe Stamps. This time around it's a layout challenge


You can use the picture above any way you wish, rotate it, flip it, Just get creative.

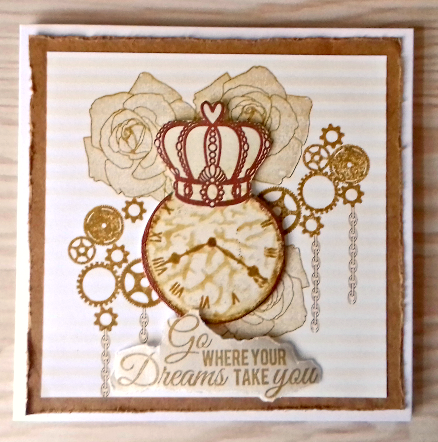
I have created a card to help inspire you.


I started by creating some backgrounds to stamp the flower and leaves on. To do this I used Nuvo Mica Mists in Wild Olive and Fresh Pear for the leaves and Pecan Peach and Turkish Rose for the Flower.


Once dried I stamped the leaf and Rose onto the spritzed papers and fussy cut them.
Working on a 5x7 inch white card blank I stamped a chevron strip using the DesignA tweed stamp set, I used Nuvo's Dried Oregano hybrid ink. I used the Mica Mists to flick droplets onto the card for added interest.  

On a white tag I used some soft form relief paste mixed with Nuvo Storm Cloud Shimmer powder and Rose Gold pure sheen glitter through the Stripes stencil, I love the effect this gives. I added the tag to my card and adhered the Rose and Leaves.


My sentiment was stamped onto one of the papers I created and then torn to give a distressed look. Lastly I added a scribbled border with a black fine liner and some Dusty Rose Vintage drops.

Here's the links to the Paperbabe products used in my project.

DesignA tweedStripes StencilRose layers and  Where your dreams take you stamp (currently out of stock)

For more awesome Paperbabe products please visit the Paperbabe Stamps Store. To join in with the challenge pop by the Paperbabe stamps blog where you will find all the details on how to link your project.

Friday, 15 February 2019

Paperbabe Stamps challenge #92 DT inspiration

Happy Friday crafters, it's time for another Paperbabe stamps challenge,
This fortnight it's a picture inspiration challenge


I am loving the colours in the inspiration picture, reds, orange and pinks create such a warm feel, something I'm craving right now as the cold isn't making my bones happy.....

Anyway, using the picture I put together a pretty little tag to help inspire you guys.


I used distress oxides on to a gesso coated chipboard tag, I used the smooshing technique, and also added some white ink through the polka dot stencil. I then added  Doodle stars in gold ink.  The light shinning through the balloons in the picture above gave a really soft delicate look and for some reason made me think of butterflies.....

I did some oxide smooshing onto a piece of vellum and let it dry before stamping my butterflies using the Butterfly pieridae stamp set,I fussy cut them and adhered them with glossy accents.

I added a sentiment from the Birthday Wishes stamp set, also in gold ink. Lastly I added some doodles in black and applied some sequins.

To join in with the challenge please pop Paperbabe Stamps Blog

Have a great weekend

Friday, 1 February 2019

Paperbabe Stamps Challenge #91

Good Morning form very snowy Bristol (UK)

Today I am sharing a DT project for Paperbabe Stamps January challenge.

The theme is "Anything Goes"


I was feeling a little under the weather when I created my project and need to make something that was quick and reflected my mood.

I opened my box of Paperbabe stash and found some Gelli prints I had made for a previous project (I knew there was a reason I kept them) I decided a collage background was the way to go.

I tore the prints into strips, exposing the white core, I adhered them to some thick kraft card using strong double sided tape.

I added some stamped patterns using cogs from one of the sets in my stash. I also added some copper embossing powder in random places and a little gilding wax to add that distressed feel.

The sentiment is a favourite of mine, sometimes I create projects and don't like the finished piece but really good comments from people about them and I'm learning to let my creativity roam free and see where it takes me.

If you'd like to join in with the challenge pop over to the Paperbabe Stamp Blog for more details.

Stay warm and have a great weekend.


Friday, 4 January 2019

Paperbabe Stamps challenge #90

Good Morning crafty friends, Happy New year.

Today is the start of a new challenge over at Paperbabe Stamps blog, the theme this time is
"New" (fresh start)

I love new things, but at this time of year I am always looking forward to spring (early I know) and planning my garden. I chose to make a card with flowers and a garden themed quote.


I lightly inked through the stencil with distress oxides to give a faint polka dot background.  I stamped the roses and leaves onto super smooth card with water based inks, I love the soft airbrushed look it gives.

I fussy cut the flowers and leaves and adhered them with foam pads. I stamped and heat embossed my sentiment in black to make it pop.  I also added 3 little butterflies to complete the look.

I hope you will be joining in with the challenge, you could even win a prize from the super talented and generous Kim aka Paperbabe herself.

I can't wait to see what you create.

Friday, 7 December 2018

Paperbabe Stamps Challenge #88

It's Fri-Yay  and I for one can't wait for the weekend and some extra sleep and crafting time. Before that let have a look at the new challenge from Paperbabe Stamps, the theme is 
"anything goes".

That means you can make anything you like, a card, journal page, a piece of mixed media art.... Just get creative and join in for the chance to win a prize. Pop over to the Paperbabe Stamps Blog for the linky and more details.

As Christmas is fast approaching I thought it would be a good idea to get on with a Christmas project.

I have used the Cute Nativity MDF substrates and matching Stamp set to put together a rustic Nativity set.


Now let me start by saying I'm not religious but I have always loved a nativity scene. In fact Nativity scene hold a special place in our families heart, let me tell you a funny little story,  It was a couple of days before Christmas  and myself, Hubby and the kids were visiting my Mother in Law.  She had a beautiful Nativity set up and each year she would bring out each of the key characters on  the day they arrived and light a little candle too.

This particular year she had a little mishap while lighting the candle and managed to set fire to the snow on top of the stable. Hubby and I were in the next room and heard one of the kids shouting "Babcia (Nan in Polish) has set fire to the Nativity", I think the other was shouting "oh no poor baby Jesus"!!!  I didn't know weather to laugh or cry, luckily hubby dealt with the flames and saved baby Jesus!!

This was the last Christmas we were together before my Mother in Law passed away, every year since, we all chuckle every time we see a Nativity scene and remember that moment.


To create the nativity I put together a stable using some salvaged wood, I used twigs for the fence panel and added straw to the floor and moss to the roof.  I even placed some Alfalfa rabbit treats that look like bales of hay into the stable.


As I wanted a rustic look I decided not to paint the MDF substrates and instead stamped straight onto them and coloured using a wash of Neocolour II water colour crayons. 

You might remember that last year I made a Nativity plaque with the same kit from Paperbabe but it was a different look all together, you can see it here.

I really hope you'll join in with the challenge, I can't wait to see what you create. Have a fabulous weekend.

Friday, 23 November 2018

Paperbabe Challenge #87

Good morning, today we have a new challenge over on the Paperbabe stamps blog, this time around it's a sketch challenge


You can use the sketch any way you like, flip it, rotate it just get creative. I decided to make a scrapbook layout


I used the Herringbone stencil to add the detail behind the flowers which I stamped using the Peony and Bud stamp set and fussy cut. I added splatters in the background with distress oxides in the same colours I stamped in. I added a sentiment from the Birthday wishes set and then chose 3 photos to add to the layout.

To join in with the challenge pop over to the blog and link up your project, there you will find all the details, I can't wait to see what you create.


Friday, 9 November 2018

Paperbabe Stamps chellenge #86 DT inspiration

Hey there crafters, today we are starting a new fortnightly challenge at Paperbabe Stamps, the this this time around is "Animals/Pets"

The theme can be used in any type of crafty project, be it a card, mixed media piece or maybe even a scrapbook layout.

I have put together a project to inspire you


Meet Mr Floppy Ear. How cute is he?

I decided to make a Mixed media decoupaged card using the White rabbit template, face stamps and a few stencils from my Paperbabe stash.

I started by creating some prints on my Gelli plate using the following High viscosity Pebo acrylic paints; Buff Titanium, Raw sienna, Yellow Ochre, Naphtolene Carmine and Iridescent gold. I used some tissue paper and stencils to help create patterns and texture to the print.

Once dry I drew around the templates for the White Rabbit on to the prints, deciding which print to use for which part of the rabbit and his clothing as I went. I then fussy cut them and added some Distress Ink (Vintage Photo) to the edge of all the cut pieces, this helped take away any stark white and kept with my vintage feel.

I assembled the Rabbit using foam tape to add layers and shadows, I love decoupage style projects.  To finish the rabbit I stamped his face in brown ink and added a few pencil lines to his whiskers and eyebrows.

My card base was also a Gelli print using the Naphtolene carmine and iridescent gold along with the checkerboard stencil.

I am so pleased with how Mr Floppy Ear turned out, he's so cute and full of charm. Here are the links to the Paperbabe products I used


To join in with the challenge pop over to the Paperbabe Stamps blog where you will find all the details and linky tool, I cant wait to see what you create.


Friday, 26 October 2018

Paperbabe challenge #85 - design team inspiration

Good morning crafty friends, it's time for a new challenge from Paperbabe Stamps
This time we have a picture inspiration theme


You can use the inspiration any way you like, pick out the colours, use an image or just be inspire by how it makes you feel.

I was feeling all Halloweeny and decided to create something a little moody and different from how I would normally use the Alice template.

I chose to go for a more goth like Alice


To create my project I chose to work with the Rose edge layered frame mdf substrate. I used the Alice portrait template and Female face stamps to sketch out my picture, I then added colour and detail with both acrylic paint and water colour crayons.

I like how Alice looks a little spooky and ready for a haunting time this Halloween.

If you'd like to play along and join the challenge then pop on over to the Paperbabe Stamps blog and link up your project and you also find all the details on prizes and when the winner will be announced, good luck, I can't wait to see what you create.

Friday, 12 October 2018

Paperbabe stamps challenge #84

Good morning crafty friends, it's time for a new challenge over at the Paperbabe stamps and this time it's a "Anything goes" theme.

I have put together a cute little card with an added twist, Using the DesignA Adorimals and the matching Kawaii face stamps, Terri stamped and coloured her images before turning them into 5 cute animals on magnets. They were added to a card which was inked with the Polka dot stencil and a sentiments added using the Watercolour alphabet stamps. The animals can be removed and used as fridge magnets to enjoy forever more.


To join in with the challenge pop over and visit the Paperbabe Stamps Blog, there you will find all the details you need on how to join in and the prize information.

I can't wait to see what you create.

Friday, 28 September 2018

Paperbabe Stamps challenge #83 Design team project

Good morning everyone, today we have a new challenge over at Paperbabe Stamp
This time round it's a sketch challenge


You can use the sketch any way you like, flip it, rotate it or keep it as it is. Let your imagination run wild.

I used the sketch to create a Christmas card. I know it's only September but it's never to early to start thinking about all those cards that need making.


I thought it would be fun to use some trees and a little deer to represent the image in the corner of the sketch.


Now it's over to you, To join in with the challenge pop over to the blog and link up your project. You'll find all the information you need, I can't wait to see what you create.

Friday, 31 August 2018

Paperbabe Stamps challenge #81

Hey crafters it's time for a new challenge over at Paperbabe stamps, the theme this time is picture inspiration


You can use the picture in any way you wish to inspire a project and join our challenge.


I create mixed media page to help spark your creativity


I started by inking a distress oxide background using the colours from the inspiration picture as my pallet. I then used the Bottle of stamp set to create my potion bottles. I added texture to the background using the Checkerboard stencil and a brown fineliner pen.


By adding the words from the stamp set in a repeated pattern across my background it not only adds interest but feels like someone is reading out a spell.

If you want to join in the fun pop over to the Paperbabe Stamps blog and link up your project and you could be in with a chance of winning a prize from Kim.

Good luck, I can't wait to see what you make.


Friday, 17 August 2018

Paperbabe Stamps Challenge #80

Hey crafters, it's Friday and almost time for a restful weekend but first....

It's time for a new challenge over at Paperbabe Stamps and this time is our faviorite
"Anything goes"

You know how this one works, create anything you like, let your creativity roam free and share your project with us for the chance to win a prize.

Here's my DT inspiration


I created a little note card, using the Kawaii face stamps and the DesignA adorimals stamp set.

I stamped the cute fox and coloured him with pencils. I used distress oxide inks to create a background. I used a brayer to roll the diluted oxide onto the card, this gives a really cool effect. I then stamped one of the stamps from the DesignA tweed stamp set to add a decorative edge and finally added a sentiment from Whimsical woodland set 4.

I also thought a little twine bow would add a little more dimension to the card.


By placing my little fox on foam pads he sits proud and stand out, look at how cute he is.


If you'd like to join in with the challenge pop over to the Paperbabe Stamps Blog and find all the details including the linky tool.

I look forward to seeing what you create.

Thursday, 2 August 2018

I'm a little late to the party as I've been away and wasn't around for release day of Paperbabe Stamps newest additions.

Fear not, I have made some projects and have inspiration to share with you.

Lets take a look at the new stamps

First up is Isometric Fun


This set can be used to create 3D lettering, Optical illusion and patterns. There are so many ways that you can use this set in your projects and we can't wait to see what you crate.


Next up is the Like Clockwork set which coordinates with the Hatter frame from our last release.


Adding clocks, cogs and hands to you cards and mixed media projects will be fun with this set, you can use the elements together or separately, let your creativity run free.


I have made a couple of cards to show you how the stamps can be used


To create this vintage themed card I used the following stamps and stencils Bottle ofLike clockworkOrnate crownRose layersStripes stencil and the Bottle of stencil. I kept the colour pallet simple with shades of brown to add to the aged feel of the card.


Using the Isometric fun stamp set I created a optical illusion that give the impression of stacked blocks. I added a sentiment using the Birthday wishes stamp set


I also have a little extra that I've been working on


I've been experimenting with creating letters using the isometric grid. It's a really fun thing to do, you just need to practise and plan before you start on your final piece.

The new stamp sets are in the store and ready for you to purchase

Please pop by the Paperbabe stamps blog and see what the rest of the talented DT have created.

Friday, 20 July 2018

Paperbabe stamps challenge #78

It's time for a new challenge over at the Paperbabe stamps blog and the theme this time is 
"It flies"

So think wings, feathers, butterflies.......

I put together a mixed media note card to help inspire you


I started off by creating a background with distress oxide inks and Checkerboard stencil , Knit stencil and Roses stencil to add texture to my background.

I then stamped and heat embossed butterflies using the Pieridae Butterfly stamp set. I also added some detail with a fin liner and edges the card with black ink.

If you'd like to join in with the challenge pop over to the Paperbabe Stamps Blog and find all the details including the linky tool.

I look forward to seeing what you create.

Friday, 6 July 2018

Paperbabe Stamps Challenge #77

It's time for a new challenge over at Paperbabe Stamps
This time it's a picture inspiration challenge


You can use the picture any way you choose, the colours, the picture, just let your imagination carry you and be creative.

Here's my DT Inspiration


To create my project I started by inking a background with Distress Oxide inks. I then heat embossed my sentiment in black before adding some black and white inky splats.  I then used the 7mm checkerboard stencil to apply white ink, I outlined some of the inked areas with a black fine liner pen.

I then added a black sketchy border and mounted my project on to some black card.

To join in with the challenge pop over to the Paperbabe Stamps blog and link your project and you could be the winner of a fab prize from Kim aka Paperbabe.

I can't wait to see what you make.

Friday, 22 June 2018

Paperbabe Stamps challenge #76

Morning Craft folk, it's Friday and time for a new Paperbabe Stamps challenge.

The theme this time is
"Anything Goes"


I have made a CAS card to inspire you, I used the Rose layers stamps, Birthday wishes stamps and one of the stripe stencils.

I stamped my roses on to a piece of white card using tonal inks from Altenew, I then stamped the word "wishes" over the roses in black ink, I stamped it 3 times to ensure I got a solid crisp image (a stamping platform comes in handy for this) I then stamped "sending you" onto a piece of white card and timed it down, I matted it on to some black card to make it pop.

To create the black and white stripes at the edge of the card I used one of the newly released stripe stencils and some black ink. This was done direct onto my card base and then I added the stamped panel on top using double sided tape.


Why not pop over to the Paperbabe stamps blog and see what the rest of the tea have created. While you're there you will find all the details on how to join in with the challenge and the prize information.

I'm off to the Handmade fair at Bowood House today where Kim from Paperbabe is exhibiting, if you are near by please pop in and say hello.

Wednesday, 30 May 2018

Paperbabe Stamps New Release


 It's release day for Paperbabe Stamps and we have some fabulous projects to share with you. Over the next 3 days we will be sharing projects made with the new release, each day will highlight a different from the release.

I have used the new MDF frame  which gives the impression of looking up through the rabbit hole at Alice.


I used the Alice mixed media template and Female face stamps to create my Alice Portrait. I then embellished it with two of the MDF Flourishes and the Go where your dreams take you stamp.


My outer frame was painted using acrylic paint in 3 shades of green, black and white. I used a fan brush to flick the paint towards the centre of the frame creating texture.
My base layer and Alice herself were painted using Neo colour II.


You can find all of the products used in the Paperbabe Stamps Store (New release will be in store on 2nd June) and more information and inspiration at Paperbabe Stamps Blog.

Friday, 25 May 2018

Paperbabe Stamps Challenge #74 - Design Team Inspiration

It's Friday and time for a new challenge over at http://paperbabestamps.blogspot.co.uk/

This fortnight the theme is 
"DOODLES"

You can choose how to interpret the theme, Add doodles to embellish a stamped image, doodle inside a stamped image, zentangle, create a background....the options are endless. Just have fun and be creative.


I've created a CAS card using the Pom Poms from


I stamped the pom poms and leaves in shades of teal and then used a silver pen to outline and doodle. I added a vellum strip, metallic thread and sequins to embellish my card. The word Create was sprayed in silver to tie the look together

To join in with the challenge pop over to the Paperbabe stamps blog and link your project, by joining in with the challenge you could be in with a chance of winning a prize from the lovely Kim Costello aka Paperbabe.

Friday, 11 May 2018

Paperbabe Stamps Challenge #73 - Design Team inspiration


Hey there Paperbabe stamp fans, it's time for a new challenge, this time we have a picture theme to work with. You can use the colours, patterns or any element you wish, just have fun and let your creativity run wild.


I have created a card to help spark your imagination


To create my clean and simple card I used shapes from both the Doll face stamp set and Folk Fabrique stamp set and then added a sentiment from the Birthday Wishes stamp set. I chose to create a retro pattern in colours from the inspiration picture, I placed my design diagonally over the lower part of my card to create a modern look with movement.

I hope you'll be joining us in this challenge, if you do you could be in with a chance of winning a prize from Paperbabe herself Kim Costello.

http://paperbabestamps.blogspot.co.uk/ is where you need to go to link your project.

Good luck and I can't wait to see what you create.


Friday, 27 April 2018

Paperbabe Stamps Challenge #72

It's time for another challenge over at the Paperbabe Stamps blog and this time around it's a  fan favourite "anything goes" challenge.

I have created a simple card using the Cute nativity stamps and a sentiment from the Whimsical woodland stamps.

I stamped my images and added a simple water colour back ground and a piece of washi tape to embellish.  I've been wanting to use the nativity stamps outside of Christmas for a while now and was just waiting for the right time.


You to can join in with the challenge by creating a project and sharing it over on the blog, as always there will be a prize up for grabs.

I can't wait to see what you create.