Showing posts with label altenew academy. Show all posts

Saturday, 23 February 2019

Zentangle for card makers day 2

Hi there, I hope you are having a great weekend, today I am sharing a card I made as homework for day 2 of the Zentangle for card makers class over at Altenew academy.


The homework was to practice the catkin pattern. I found the pattern itself easy enough to draw, but the placement of it on my project was something I struggled with. I think this is mainly because I dont like my own doodles (or handwriting)


To create my card I created a water colour background using Spring Garden Watercolour Brush Markers on to watercolour card. Whilst this dried I stamped out one of the floral images from the Frosted Garden stamp set using 4 ink colours; Bamboo, Forest Glades, Hydrangea and Pink Diamond.

My design was placed onto a panel cut with the Dotted Scales Cover Die

Right that's it from me, I'm off to take lesson 3 and prepare Monday's "3 ways with" post

Have a good day.


Friday, 22 February 2019

Zentangle for card makers day 1

Happy Friday guys, today I am sharing a zentangle card with you.

I am currently taking the Zentangle for card makers class over at Altenew academy


On the first day the tutor Amber, taught us to use "aura" on outline stamped images.  I used the Beautiful heart stamp set from Altenew to stamp the flower and leaves. I added one layer of the detail using the last layer stamp, this guided me when adding my lines.


I used Minty mint and Pink Diamond inks, the sentiment is from Ditsy print stamp set. I stamped it using jet black ink and added a strip of golden edge washi tape.


I'm about to take the day 2 lesson, I can't wait to learn another technique and to share my card here with you.  Have a fab weekend, I'll be back soon.

Tuesday, 26 June 2018

One Layer wonder - AECP final card

It's a very hot day here in the south west of England and I thought while hiding from the sun I'd hang out in my craft room and create my final card for the Altenew Educator Certification Program.

I've been taking the One layer wonders class at Altenew academy which is taught by Kelly Latevola. The class take you through different ways to create one layer cards which look like they have dimension.


So onto how I created my card

I used floral images from two stamp sets along four inks sets in warm sunny colours to create the background images. I will add links below.  I masked off the centre section of my card and stamped the flowers and leaves using minimal masking.


I then removed the masking tape and used a black fine liner to edge the blank area where my sentiment was going to be stamped. I then used 3 shades of grey artist markers to flick outwards from the black line, this creates a shadow giving the impression that the blank panel is raised.


I then stamped by sentiment and added a fine border around the edge of the card with a fine liner. Lastly a scattering of sequins adds that special touch.

Links


The second set of flower stamps I used I can not link to yet as they haven't been released.......yes I've given you a sneak peek at something coming in the July release.

I can not tell you how happy I am with this card, it really captures the hot summer vibe that is going on right now. 

Wednesday, 13 June 2018

Background Magic with Altenew Academy


I recently took the Background Magic class at Altenew Academy as part of the Altenew Educator Certification Program, the class was taught by Laurel Beard and consisted of six lesson teaching ways in which you can use your background stamps to add that magical touch to your cards.


To created my card I used the following Altenew products


I started with a 6x6" piece of white cardstock, using the diamond pattern play stamp and embossing ink I stamped the piece of card, I then heat embossed using the Crisp Copper embossing power. I stamped the image again this time turning it a quarter turn to the left and heat embossed. This created a stunning pattern for my background.


I then added colour to the stamped background using Altenew crisp inks in Lagoon, Midnight Violet, Galactic Stream and Purple Wine.  I added some of each ink to my glass cutting mat and spritzed them with water, I also spritzed the stamp background. I then used a paint brush to drop in some of each colour and allowed the water move the ink around.


Once dry I cut the panel diagonally and trimmed it down, I embossed 2 strips of card using the Copper embossing powder to place just under the edge of my patterned pieces, this ties the look together. I adhered the patterned pieces to a card blank and stamped my sentiment in black ink.


I am so happy with how my card turned out, I hope you'll give this technique a try too.

Tuesday, 22 May 2018

Stunningly Simple Watercolor Techniques

Good morning crafty friends, today I have a new card to share with you. I created this card after taking the "Stunningly Simple Watercolor Techniques" class at Altenew Academy.


I chose to work with the colour teal as it's my favourite colour and looks so yummy in the warm weather we are experiencing. 

I started by stamping and embossing one of the large images from the stamp set in Platinum. I then added a wash of clean water to the card stock before adding teal tones to the card.  I used Altenew Sea Shore Inks with a little water to create a colour wash.  I started off darker at the top of the card and faded the colour as I moved towards the bottom. I also added flicks of teal to the card to add texture and interest.

Once dry I embossed a piece of white card with the Platinum embossing powder so that I could create some embellishments for my card.  I added a piece to the bottom of my card and also die cut my sentiment and some sequins from the same piece, continuing the colour theme.

I learnt so many things from Lydia Evans classes and will be adding the new techniques to my cards.

The products used are linked below

Tuesday, 8 May 2018

For the Love of Color - Altenew educator certification program


Today I am sharing not 1 but 2 cards I created after taking Julie Altermann's For the Love of color class over at Altenew academy.


The class was awesome and full of hints, tips and techniques to help us crafters add that extra detail and lots of colour to our projects.  I learnt lots from the class and could literally make a dozen cards with all the ideas in my head right now, but in my attempt to rein it in and stay controlled I made 2.

The things that stuck with me most from the class were not to be afraid of adding a mix of bright and bold colours to our cards and to think about different ways in which to get colour in there, be it different medium or with the use of die cuts.

I decided that I would go bright with shades or yellow, orange and red and I would also use a die to help me with making my design.


I chose to use the Mandala Die to cut a stencil to ink through. In the process of stencilling the die cut piece got very inky and looked too pretty to dispose of, so I used it to create my second card.


The inks I used in my cards were


Let me know what you think of my cards, I'll be back soon with more crafty makes.

Thursday, 22 March 2018

Masking Unleashed - Altenew Educator Certification Program

Today's post is all about masking and is my last card for the Level 2 Altenew educator certification program.


I haven't worked with the Painted flowers stamp set for some time and thought this would be a good time to dig it out and spend time with an old favourite.

I started by stamping the flowers I was going to be using onto some making paper and cut them out. I used the masks to allow me to place images in the back ground while protecting the stamped images in the foreground. 

I chose a combination of pinks and peach colours to work with. I stamped the peach flowers in the lower part of the card first, I then masked them and stamped the pink flowers and outline images.  I then repeated this process in the top part of the card.

I added a sentiment from the Beautiful Quotes stamp set and embellished with sequins.

I've added links to the products used for your convenience.


I hope you've enjoyed today's post, I will be back with more very soon.

Wednesday, 7 March 2018

Polychromatic Peony Dreams

I am so excited to share this post with you, I recently took the Polychromatic class at Altenew Academy and loved the inspiration shared, this coincided with my Peony dreams dies arriving so I just had to use them to make my next assignment for the Altenew Educator Certification program.


What does Polychromatic mean I hear you say, well the dictionary defines it as

Polychromatic
of two or more or of varying colours; multicoloured.


I started working with a A2 piece of card (4.25" x 5.5") I used some Black Soft form relief paste from Colourcraft  along with the Watercolor stripes stencil to add some texture to the panel. I set this aside to dry.

Next I gathered 4 sheets of purple cardstock and also a sheet of white. I added double side adhesive sheets to the back of all the cardstock.


Using the layering guide I cut my flower dies in the purples shades and leaves in the white. By adding the double sided adhesive before cutting it saves me having to use wet glue and I also get edge to edge adhesion.


On the reverse of the die packaging there is a layering guide, which can also be found at Altenew.com 

I used the Grey Artist Markers from set B to colour the leaves, next I peeled the backing from the die cuts and layered them together. To put the card together I added the leaves and die cut flowers before  adding a stamped and heat embossed sentiment to a strip of card.


The products I used to create the card are listed below.


Wednesday, 28 February 2018

In the mood for colour - Altenew Educators Certification Program

I recently took the "In the mood for color" class over at Altenew Academy as part of my Educator Certification program that I am taking part in.


In the class I learnt about how certain colours reflect mood and emotion. This morning I was feeling really calm and as such chose to work with blue. I also felt strong and organised so thought it would be good to work with a shape that also reflects that feeling.


I couldn't wait to use my new Trigonometry Stamp Set and Tirgonometry Die set to create a card.  I love geometric cards as they are suitable or all genders and ages.  I wanted to make a modern looking cards so added some of the triangle shapes using the newly released Deep Blue Seas mini ink cubes (which are also available in Large ovals size too).  I used some silver embossing powder to add some shine in places. I die cut a couple of the Trigonometry die in to the stamped panel to add extra detail. I then used the "thanks" sentiment from Halftone circles Stamp Set to add my message.

I've never really thought to much about why I use the colours I do in my crafting but now when I look at my cards I can see what I was feeling at the time I crafted them.

Thank you popping by today, I'll be back soon with more crafty creations.
Terri x


Wednesday, 14 February 2018

Creative Watercolor media - Altenew Educator Certification program


Today I am sharing a card I created as part of the Altenew Educator certification programme. After taking the Creative Watercolor media class I was inspired to get creative.


I used an ink smooshing technique to create a coloured panel which I dried with my heat gun.  I then used the diamond pattern play stamp to heat emboss in white on top of the coloured panel.


I then used the Layered Medallion B die to cut, creating a beautifully decorative piece. I added a black die cut sentiment using the script word dies 2 die set.

I am really please with how my card turned out, the bright colours and the intricate pattern are so pretty.

Wednesday, 10 January 2018

Anniversary card - Altenew Educator certification program challenge


I am so excited to be sharing this project with you, this card is my final one for the Level 1 Altenew educators certification program. After taking all 10 classes and submitting my work I was asked to make an Anniversary/love/wedding card skils things I have learnt from 3 of the classes.

Choosing which three was to use was a little tricky as I learnt so much and in a way I think my card combines elements from several classes.


I was inspired by the All about layering 1 and 2 classes and wanted to use layered floral images so choose to use the Vintage rose stamps and dies. 

I used the following colours for my flowers; Blush, Peach perfect, Rouge and Caramel toffee.


I loved the Easy die cutting class and some of the things I learnt, so my leaves were die cut from vellum and then heated embossed using Golden Peach embossing powder.


In the Clean and Simple Boutique cards class I learnt about the use of white space and adding foiling or metallic elements to projects, adding embossing powder to the leaves creates a metallic effect, the shine is stunning yet subtle.

I have had a blast and learnt so much form some very talented designers/tutors.

I hope this card gets me a pass and I can progress on to level 2.

Thanks for stopping by today, I hope you have liked this project.

Terri


Friday, 5 January 2018

Easy Die cutting techniques - Altenew Educator Certification Program

Good morning everyone, today I am sharing a clean and simple stamped and die cut card.


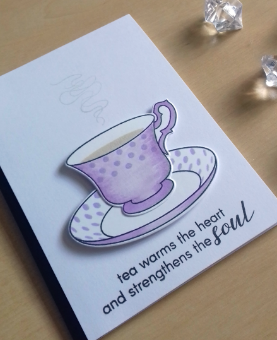
I created my card using Altenews Vintage teacup stamp and die set. I was inspired by the Altenew class Easy die cutting techniques. I think sometimes it's easy to get caught up in trying out the next new technique and to forget about how we can make clean simple cards using the set we have in our stash.


I stamped my tea cup and saucer onto some Solar crest card and used Altenews Artist markers to colour the image.  I added the polka dot detail using the stamp in the set along with Lavender fields ink set.


I added the steam image in grey and my sentiment in black.

I think letting the imagery speak for itself makes this card beautiful

Here's links to the products used


Thursday, 4 January 2018

Irresistible inking techniques - Altenew Educator Certification Program


Today I am sharing a card inspired by the lovey Sara Naumann and her Irresistible Inking techniques class at Altenew Academy.

As you know I am taking part in the Altenew Educator Certification Program and have to take course to pass each level. This course was part of the level 1 requirement but you to can take the course to learn new skills and new ways in which to use your crafty stash.


So what did I make?

This card is very different than my usual style but I adore it, it reminds me of some of the cards my Mum and step farther used to get each other, they were on recycled hand made paper and very muted water coloured images.


I used Sara's tips on brayering a background panel using my Altenew crisp inks, I dab a little ink on to my glass mat and spritzed with water, I then roll my brayer through it and then onto my white cardstock. I first did this with the Caramel Toffee ink, blasted it with my heat gun and then repeated with the rouge ink.


I then stamped and die cut some tulips to co ordinate with my chosen colour palette. I adhered my brayerd background onto some white card and edged the card with Caramel Toffee ink by running my ink pad against the edges of the card.


I finished it off by adding some twine and a sentiment. I used foam pads to adhere the brayerd panel to add some depth and dimension. My sentiment on the outside reads "sending you" and on the inside of my card it says birthday wishes.

Here are links to the items I used


Wednesday, 3 January 2018

Let it shine - Altenew Educator Certification Program

I can't believe it's Wednesday already, I'm looking forward to the weekend and a few extra hours of sleep. Going back to routine after the Christmas holidays has really thrown me.

While the whole house tries to fight off a yucky virus I'm keeping busy by creating pretty cards.

Todays card is Inspired by the Let it shine Altenew Academy class I took this week as part of the Altenew Educator certification program.


I started by stamping the main flower layers using the Cool Summer nights crisp inks onto white cardstock. I then stamped the outline with embossing ink and sprinkled some bonding powder over it. I then used my heat gun to cure it before adding some copper transfer foil. This gives a very pretty effect and a stunning shine.


I repeated the same process for the leaves but use Frayed leaves crisp inks. I then fussy cut both sets of images and set them to one side.

For my back ground I stamped a panel using the smaller images in the stamp set and coloured them using Altenews Artist markers in colours which match the ink pads. I coloured very simply as I dont want them to be the prominent feature of my card.


I then die cut a white front panel and stamped a few of the smaller images in the top right corner as I will be adding my die cut flower and leaves over them, this help to and depth to my card.

My sentiment is also foiled in the same way as the flower and leaves. All that was left to do was but all the pieces together.


Here are the products I used

WOW bonding powder
Stix2 copper transfer foil

Monday, 1 January 2018

Celebration: Stencil techniques - Altenew Educator Certification Program

Good Morning everyone, today I am sharing a project that I created using some new techniques inspired by the Altenew Academy class Celebration stencil techniques.


Have you ever used your stencils to emboss or letter press?

I did!

I inked my stencil with embossing ink and laid it on top of my cardstock, I then laid my embossing mat on top and run it through my die cutting machine.  When I removed the stencil I sprinkled the Golden peach embossing powder on the cardstock and then melted it with my heat gun.


I also embossed a strip of card in the Golden Peach embossing powder to add to the left hand side of my card. I added a sentiment using the You are stamp set.

I love how I now see stencils in a whole new way and can't wait to create some more cards with the skills I've learnt.


Here are links to items I used

Sunday, 31 December 2017

Easy Ink blending techniques - Altenew Educator Certification Program


Good morning and a happy new year to you all

This year I am determined to improve my crafting skills, as such I am currently working my way through Altenew Academy classes and today I am sharing a card made using skills from the Easy Ink Blending techniques course.


I created my card by blending an ombre background in shades of teal. I flicked some water at it and dabbed with tissue, this leaves a bleached effect creating added interest in my project.

I die cut a cover panel using Altenews layered medallion A die, I adhered this to my ombre background and then blended another smaller piece of card to use to die cut my sentiment. I also cut 4 more sentiments from white card and stacked them together using glossy accents to create a faux chipboard sentiment.


Die cutting the Hugs sentiment from the same ombre as tused in the background ties the look together, I added a wrap of vellum and adhere the sentiment and some AB sequins.

I am thrilled with the results of this project and hope you enjoy it too.


Here's links to the items I used


Many thanks for stopping by today.

Saturday, 30 December 2017

All about layering 2 - Altenew Educator Certification Program

Hi everyone, I'm back with another project inspired by one of the Altenew Academy classes.

I just finished the second course which is all about layering 2, I decided to use my brand new stamp set Winter rose which I received for Christmas from my husband.


I love this set as it's a very loose layering set and gives a kind of screen printed look.


I chose to use Rose Quartz, Puffy Heart, Purple Wine and jet black ink for my flowers. I stamped 3 flowers using a basic masking technique and then added in some leaves using Silver stone crisp dye ink.


I placed a strip of pink glitter washi tape along the bottom edge of a card blank and added my stamped panel using foam pads. 

I added 3 black sequins and a sentiment stamped in black ink to tie the look together.


I enjoy using layered floral stamps as they give such a pretty look.

Here's the links to the items I used


Thank you for taking the time to stop by today.

All about layering - Altenew Educator Certification Program


I am pleased to tell you that I have been selected as part of the first intake for the Altenew Educator certification program.

The program has two levels and each requires you to take part in academy classes and create a project to submit. Once all of the first levels projects have been submitted and approved there is another challenge..... Once that is passed I can move onto the next level.

I can't tell you how excited I am. I have been watching the course videos making notes and practising techniques before I jump in and make my projects to submit.


Over the next few weeks I will be sharing projects I create as part of the course and hope you'll enjoy seeing them.

I thought I'd share my first project with you


My first card that I created is from the Altenew Academy class All about layering.

This class is a fantastic starting point if you are looking to get into creating with layered stamps, it's also one of the 10 classes need as part of the Educator certification program.


I created my card using one of Altenews simple layering sets, although the stamped images dont go on top of each other you still need to understand placement, use multiple stamps to make your image  and have a good eye when stamping.

I started by stamping the main body of the camera image on to white cardstock using Jet black ink, I then added the detailed layers using Mountain Mist and Rose quartz inks.


I fussy cut the image and set it aside. I wanted to add some stars that will sit behind the camera and radiate out, this helps to ground it. I used a tiny star from the Baby Zoo stamp set. I placed the camera image on foam pads and adhered it to a panel of white card.

I then stamped my sentiment under the image. To prepare my 4.25" x 5.5" card I added washi tape down both edges. I then adhered my panel using some foam tape for added dimension.


Here are links to the products I used


Jet Black Crisp Dye Ink

Thanks for stopping by today, Please let me know what you think of my card in the comments below.