Wednesday, 29 November 2017

ARTplorations Stencil Blog hop


Hey crafty friends today we are celebrating the newly released stencils designed by Sanna Lippert from ARTplorations.

There are 8 stencils in the release which can be found in the store using the following link

I was sent 2 of the stencils to work with and have created a couple of cards to share with you.


I created my first card by using distress oxide inks to give a yellow backdrop to which I added flowers and leaves using the /Flowers-1 stencil and Leaves-2 stencil. I then added a sentiment using the Fond-Expressions stamp set before using some Nuvo drops to embellish. I chose to outline the flowers using a black fine liner pen to tie in with the black sentiment.


My second card is in-keeping with fall, I choose to create a background using the Leaves-2 stencil. I added some distress oxide ink through the sentcil and then sprinkled with clear embossing powder to add texture to the card. I did this in both brown and green ink. I then stamped the cute scarecrow form the Wonderfall-Time stamp set in brown ink and clear embossed on top.


You can see more inspiration from the STAMPlorations team over on the blog


To join with the hop leave comments on the designers blog posts and you could be in with the chance of winning yourself a prize;
  • Commenting closes on December 4, Monday
  • Prizes: (1) winner of $20 gift certificate, (2) winners of their choice of 3 Sanna Lippert Designs stencils
  • Winners will be randomly drawn from comments left on the STAMPlorations blog and participating designers blogs
If you are wanting to purchase anything from the STAMPlorations store why not use my discount code and earn yourself a 20% discount; use code STAMPGIRLTERRI at the checkout.

Monday, 27 November 2017

What surfaces can I Screen print on? Colourcraft Design Team project

Today I have a post on the Colorcraft blog talking through the different types of surfaces you can screen print on to.

From paper to wood and acetate to cork there are so many options.


You can view the post by clicking on the link below


Wednesday, 22 November 2017

Altenew's Layeed Laurel, 1 stamp set 5 ways


Thank you for stopping by today, I am sharing 5 cards I've created using Altenew's Layered Laurel stamp set.

At this time of year us crafters find ourselves trying to get lots of cards made to send to our loved ones and at times it's really hard to think of different designs, you may have already made 50 cards and your mojo has vanished.  I decided to challenge myself to make 5 cards with one stamp set (and a few extras from my stash)

Well let take a look at what I made.


This first card a something very different from me, I'm calling it a floating card.  I made a card blank from some heavy weight acetate and added a Kraft card panel in the centre, hence me calling it a floating card! I then used the small Laurel spring to create a wreath in the centre of my card with the Green fields crisp inks.

I added some small red gems to look like berries and then die cut my sentiment form Altenew's Holiday script word dies.


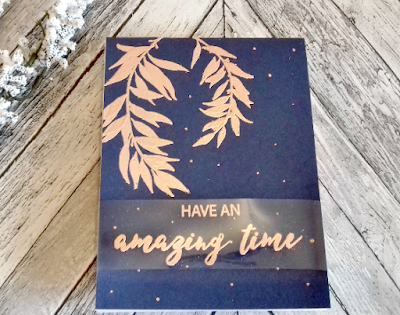
Net up is a striking Navy and golden peach embossed card. I used Altenew's Golden Peach embossing powder to emboss both the Laurel and sentiment. The sentiment is stamped on to acetate which is wrapped around the navy card before being adhered to the white card blank so that all the workings are hidden.  I also added some embossed dots to the card using an embossing pen.


I decided I wanted to go bold with my sentiment for this card so I combined the Layered Laurel with Altenew's Bold Alphabet dies.  I stamped the Laurel 5 times across the centre of my card panel using the Green fields crisp inks.  I then used the dies to cut the word "noel" out of the stamped panel.  I then cut the same word from black card stock.  On a white card blank I added a piece of gold glitter washi tape and then adhered the stamped panel. I then inlaid the black letters, this gives the card a totally flat surface.


This card was a simple one, I stamped the Laurel with the green fields inks and then used a sentiment from the Lyrical script stamp set, which I heat embossed in black.


My last card is something very indulgent, grey with lots of copper embossing. I used one of the leaf layers from the Layered Laurel stamp set to stamp a background onto some grey card using Altenew's embossing ink and then I added some copper embossing powder and set with my heat tool.

I used the Holiday script word dies to cut my sentiment, but as I wanted it to look dimensional like a piece of chipboard I cut 2 from the grey card and a third from a piece of copper embossed card. I then layered them together to give me a chunky sentiment.  I also added a second sentiment using the Lyrical Script stamp set. It reads "he will bring us goodness and light"


And that is my 5 cards with 1 stamp set.  I love trying to create different looks and feels with the same stamp set.  

Which is your favourite card? I think mine is the Navy and Golden Peach embossed card.


Saturday, 18 November 2017

Tattered Lace Crescent Creations - DT Samples


I am so glad it's the weekend, I need some time to rest and relax after a busy week.

Today I thought I would share some cards I made for the launch of Tattered Lace's Crescent Creations collection.

I was sent 2 sets of dies to work with;  crescent-creations-florals and 3d-banners-and-tags


My first card is a extra special blue and white card made with elements from both sets. I used the little loop swag to create a border around my main topper. My sentiment is cut form blue with a silver drop shadow.


Next up is a beige and brown card, I used elements from both sets to create an oval shaped arrangement with white accents.


My third card is a blue and green creation. The background paper is from the previous forest pines collection, I used My Craft Studio to change the colour to suit my project.  


Last but by no means least is a simple black and white card. I love the classic look of this card, all I added was a few gems and a sentiment topper to complete the look.


Thats all from me today, I'm off to enjoy a lazy day of stamping and stitching.
Have a great weekend. 

Friday, 17 November 2017

Paperbabe Challenge #61 - DT Inspiration


Hey there craft friends, it's Friday Yay! It's also time for a new Paperbabe Stamps challenge.

This time round it's a sketch theme.


You can use the sketch any way yo like, flip it,rotate it or turn it upside down, it's up to you. Just let your imagination and creativity run wild.

I have made a card to help inspire you


I played with the layout slightly to create my Christmas card.  The stamps I used are Cute Nativity, Doodle Stars and Sparkle Bright.


My little galaxy/sky was made with Distress Oxides and a silver ink pad for the splatters.

I am loving the Nativity stamps, they will be featuring in lots of my Christmas cards this year.

If you'd like to join in with the challenge and be in with a chance of winning a crafty prize; pop over to the Paperbabe Stamps blog and linkup your project.

Have a great weekend.

Thursday, 16 November 2017

STAMPlorations CAS Card Challenge - November reminder


It's the third Thursday of the month and it can only mean one thing.....

STAMPlorations CAS Card Challenge reminder time!

This month the theme is


If you haven't joined in yet  here's some inspiration to get you going


To join in with the challenge vist the link below


I have a discount code for you to use on the STAMPlorations store which will entitle you to 20% off your order, this can not be used with other discount codes

Use>>>>>>  STAMPGIRLTERRI when checking out at http://stamplorations.com/shop/

Wednesday, 15 November 2017

3rd Annual STAMPlorations Giving Thanks Blog Hop & Wishlist Linky Party


https://stamplorations.blogspot.com/2017/11/giving-thanks-blog-hop-wishlist-linky-party.html

Welcome to our very special blog hop and wishlist linky party.  We have lot and I mean lot of amazing inspiration and fun to share with you. We have 36 stop on the hop, with some very talented designers joining in.


As part of the fun we also have a sale going on right now, with 40% off, how amazing is that.  As an added extra, when you place your order and leave a note in the order details mentioning my name you can get yourself a free word/phrase die worth upto $10, so for example leave a note saying "I've come from Terri's blog and would like the hello die as my freebie please"

The code can only be used once per customer.

Now on to my projects

I worked with the Wonderfall time 4x6 stamp set to create 2 cards


I used one of the leaves in the set to create a wreath with the centre cut away so that I could stamp into the open space. I love the sentiments included in the set as they allow you to build your own custom sentiment to suit your own projects.


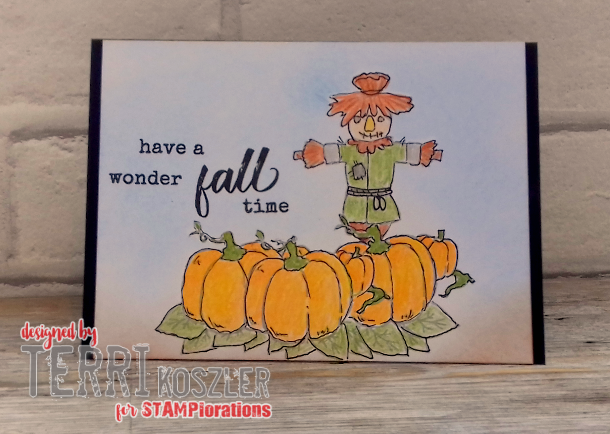
This next card is all about the Pumpkin harvest, there was some serious masking and fussy cutting involved but it was so worth it to be able to create this card. Look how cute the Scarecrow is guarding the harvest.

Prize Info

Prizes for commenting on the STAMPlorations blog and participating designers blogs:
THREE (3) winners randomly drawn from all comments left on the STAMPlorations blog and participating designers blog will each receive a $25 certificate to the STAMPlorations store


Prize for liking, commenting, tagging a friend, and sharing our post on the STAMPlorations Facebook page post:
ONE (1) randomly drawn winner will receive a grab bag consisting of new products (valued at $25 MSRP) + another grab bag of the same value to the person he/she tags


Prizes for linking up to the STAMPlorations Wishlist Linky Party:
TWO (2) randomly drawn winners will each receive products in their wishlist (up to $40 MSRP)


Prize for commenting and re-posting our Giving Thanks Blog Hop and Wishlist Linky Party post on the STAMPlorations Instagram page:
ONE (1) randomly drawn commenter will win her choice of Giving Thanks stamps (Thankful & Blessed; Wonderfall Time; Words of Gratitude; OR any 2 Typografia Thankful stamps)

Commenting on the blogs and linking up to the Wishlist Linky party ends on November 30 at 11:55 p.m. Pacific

Winners will be announced on December 10 in the November Challenges and Hops winners post. Winners have until December 31 to claim their prize.

Sunday, 12 November 2017

Tattered Lace Gateway to the Countryside collection - DT Samples

Morning crafty friends, today I am sharing some cards I've made with the up and coming launch of Gateway to the Countryside from Tattered Lace.

I was sent several dies, charisma images and papers to work with but there was a catch......... I had 24 hours from when they arrived to get them back into the post to Tatterted Lace ready for the show, I hope you'll agree that I worked well under the pressure.


My first 4 cards are made using the Charisma images, 2 of them also have the embellishment dies used with them.


I cut the image once using the "hidden valleys over the peaks" die and decoupaged it onto another uncut image. I added extra foam pads under the flowers to make them pop. I decided to create a simply classic design and let the die do all the work.


Using the same die and papers I create an aperture card with added elements from the embellishment set.


For this aperture card I used the "countrysides hidden gem" die along with the coordinating papers, charisma images and embellishment dies.  I added one of the die cut images the the back of my aperture and an uncut version to the inside of may card, this give lots of dimension to the images.


This card was made in the same way as my first card, simple and clean. One die cut layer on top of an uncut image and a little matting and layering of the papers. All I added was a bow.


The next 2 cards use elements from the embellishment sets along with backing papers to show you how you can use them without the main dies and charisma images.


I made a cute shaker card using some dies from my collection and added elements from the "hidden valleys over the peaks" embellishment die set.


For this card I started with a piece of the cardstock which I cut and X in the middle and rolled back the cuts, fixing them with red tape. I then used the embellishment dies from the "Gateway to the countryside" set. I added a sentiment into the centre of the card and added some little knotted pieces of ribbon.

The last 2 cards were made with the charisma images for the Surprise Celebrations with sparkling champagne die, but as I didn't get sent that die I thought I would show you how you can still use the printed image to create cards.


In this card I die into the image using a doily die and fussy cut the bunting form another sheet to add some dimension. I threaded some ribbon around a circle card for added interest and then added a little sentiment to coordinate.


This card was made using the remainder of the image fro the above card, where I had removed the doily section I've added acetate behind to create and apperture card. I use another of the images to fussy cut the champagne glasses, butterfly, bunting and ice bucket which I have added to the card using foam pads.  Inside the card I used the coordinating card stock to mat and layer and then die cut a sentiment. I then finished it off with a ribbon bow.


Here are the links to the products I used


You can watch the launch show tomorrow morning at 8am with Corrine and Dean on Create and Craft TV
  • Sky 674
  •  
  • Freeview 23
  •  
  • Virgin 748
  •  
  • Freesat 813
  •  
  • Apple TV
  •  
  • Amazon Fire